Filling openings of demolished doors and windows
Recently this interesting use case for dataflows came up with a customer. The setting is a renovation project where some doors get removed, which leads to two tasks: removing/demolishing the door and filling the opening left by the door. In the architect's model there is only the door and we need to generate another derived object for the ‘filler’. The request was that this filler is a wall object.
This is already a bit of a brain teaser, but we solved it with the following 8-step dataflow:
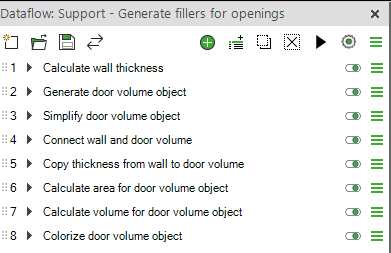
- Doors are located in walls and we need the thickness of the walls for later use in this dataflow. Instead of relying on this information existing correctly for all walls we simply calculate the thickness from the geometry.
- We generate a derived object from the geometry of the door. This new object becomes the ‘filler object’ for the wall opening. Here we choose that the generated object is a wall.
- By default the door volume object has an identical geometry with the original door. This is too detailed for us, so we simplify the geometry to just a box. Actually we use the ‘convex hull’ option instead of ‘box’ because it works also if the door is arched.
- We use the Proximity tool to generate a connection between the ‘filler object’ to the wall it fills.
- We use the connection from the previous step to copy the wall thickness from step 1 into the ‘filler object’
- We calculate the area of the ‘filler object’ from its geometry using the ‘Area Shadow Gross’ option
- We calculate the volume of the ‘filler object' from its thickness (=the thickness of the wall from step 1) and the area from step 6
- As a last purely optional step we colorize the ‘filler objects’ to make them easier to spot in the model.
As a result we have new objects that represent the filling of the openings in walls. Their geometry is in the right place, but the thickness of the geometry is most often not correct, because it has the thickness of the door object, not the wall object. However, as a property they have the correct thickness and the correct volume. This means they can be used for example in 4D to visualize the task of filling the openings and in quantity take-off for getting the accurate area or volume for the ‘filler material’. When different types of walls require different types of ‘filler materials’ it is possible to copy any information from the wall to the ‘filler object’ using the connection from step 4, which allows you to classify the fillers based on their ‘material’.
You can use this dataflow already today with Simplebim 11, but we always want to improve the solution. For Simplebim 12 we will try to come up with a solution where the ‘filler object’ is derived directly from the opening element in the wall. This approach would give us several benefits relative to the current solution.
- No need to copy the thickness of the wall because the filler object already has the correct thickness
- The filler object looks nicer in 4D because it always nicely fills the opening completely. This also eliminates the possibility for small mistakes when for example a door has ‘installation gaps’ and does not completely fill the opening.
- Works also for empty openings, unlike the current solution that requires the opening to have a filler (door or window)
I found this to be a nice example of what you can do with Simplebim and dataflows.
You can download the dataflow used in this example here.
If you have comments about this use case or ideas for other use cases, please leave your comment below!
Comments
4 comments
What a brilliant idea – I should have thought of that!
I haven't quite got the hang of the shadow calculation tool yet, and this example is helping me a bit.
Yes, the “Shadow” calculation can feel a bit abstract at first, but once it clicks, it opens up a whole new range of practical use cases!!!
Curious how others are using it.
The shadow area calculation is especially useful for complex objects such as doors and windows. When we throw the shadow of such an object on a (imaginary) plane all the details disappear. So it does not matter if the original object has door knobs, handles, panels, hinges, push- or kickplates etc. They all simply disappear and the result is a simple, clean and light weight representation of the original object. For volumes a bounding box gives a similar result and in this example we even used a ‘convex hull’, which is a bit more advanced than a bounding box, because it retains for example the shape of an arched doorway.
But you get the idea. Once you realize that this kind of things are possible I'm sure you start coming up with other similar use-cases in no time!
Yes, I understand better now; the shadows are like a flattening onto an XY plane.
I can think of a few interesting scenarios for a client; I’ll mention it to them!
Thanks for the explanation
Please sign in to leave a comment.